
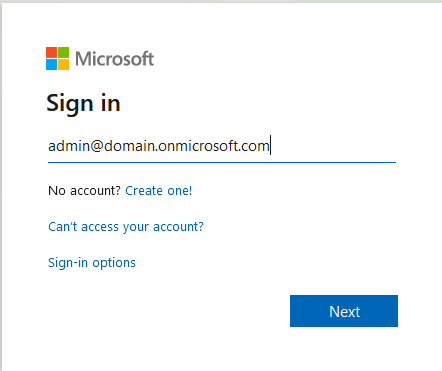
- In order to add a new domain for Microsoft Office 365 licenses, you need to log in to the Microsoft admin portal at https://admin.microsoft.com with your admin account, in the form of admin@domain.onmicrosoft.com.
- In the search box located in the top middle, type Add domain and click on the matching search result.
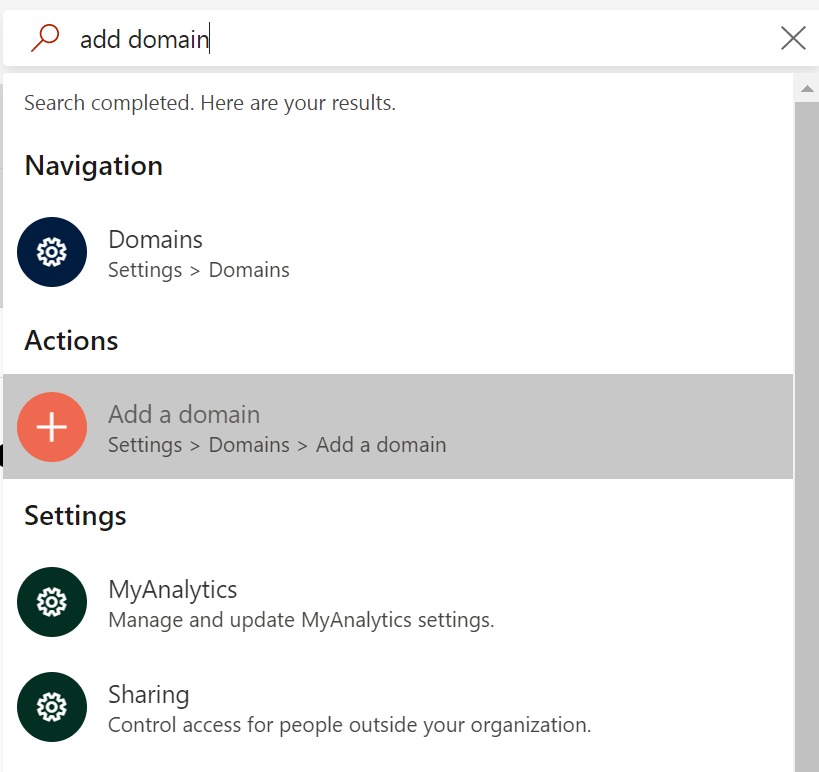
- Enter the domain name in the Domain field and click Use this Domain.

- Then you will need to select the domain name verification method. Microsoft will need to confirm that you are the owner of the selected domain.
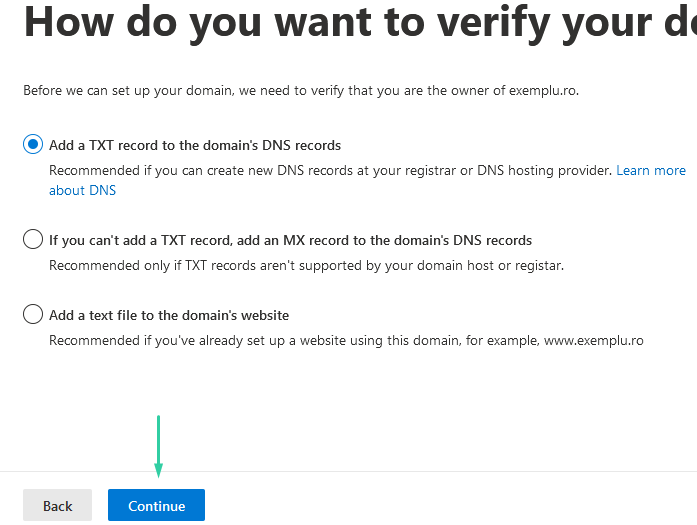
In this regard, a few options are available:
- Add a TXT record in the DNS zone of the domain: select this option and then click Next. Select the option I will add DNS records myself. Instructions on how to add this DNS record to your site will be displayed. Verification may take up to 30 minutes after you add the record. a. From the Microsoft 365 administration centre select Settings > Domains. b. Then log in to your cPanel account, or in the control panel at your DNS hosting provider, and find where to manage your DNS settings (DNS Zone in cPanel). c. From the DNS zone manager, add a new TXT record, according to the information in the domain management centre (as in the example below):
Record Type: MX
Priority: Set to the highest available value, usually 0.
Hostname: @ (or your domain name: domain.tld.)
Points to address: copy the value from the administration centre and paste it here.
TTL: 3600 (or your default value)
d. Save the record, return to the administration centre, and select Check. It usually takes about 15 minutes for the changes to take place, but sometimes it can take longer. DNS propagation might take some time, so please be patient.
2. Add a MX record in the DNS zone of the domain: this option is similar to adding a TXT record.
a. From the Microsoft 365 administration centre, select Settings > Domains.
b. Then log in to your cPanel account, or in the control panel at your DNS hosting provider, and find where to manage your DNS settings (DNS Zone in cPanel).
c. From the DNS zone manager, add a new MX record, according to the information in the domain management centre(as in the example below):
Note: The priority of this MX record must be the highest of all existing MX records for the domain. Otherwise, it may interfere with sending and receiving emails. You should delete this record as soon as the domain verification is complete.
Record Type: MX
Priority: Set to the highest available value, usually 0.
Hostname: @ (or your domain name: domain.tld.)
Points to address: copy the value from the administration centre and paste it here.
TTL: 3600 (or your default value)
Once the verification is successful, you need to add records that link your domain to Microsoft services.
Add an MX record for email (Outlook, Exchange Online)
Before you begin: If users already have emails with your domain (such as user@domain.tld), create your accounts in the administration centre before setting up your MX records. This way, they will still receive emails. When you update your domain's MX record, all new emails for anyone using your domain will now reach Microsoft 365. Any email you already have will remain with your current email host, unless you decide to migrate your emails and contacts to Microsoft 365.
You will receive information for the MX registration from the domain setup wizard in the administration centre.
From your cPanel account, DNS zone, or your hosting provider's website, add a new MX record. Make sure the fields are set to the following values:
Record Type: MX
Priority: Set to the highest available value, usually 0.
Hostname: @ (or your domain name: domain.tld.)
Points to address: copy the value from the administration center and paste it here.
TTL: 3600 (or your default value)
Save the record, then delete any other MX records.
For more information on reliable hosting and the services we offer, please visit our homepage.
Comments
0 comments
Please sign in to leave a comment.